
Claude Code Zero to Advanced: Skill 2.0 Architecture Guide Used by Experts (With Complete Steps)
If you've read my previous article "Secrets of Claude Code for Beginners: Skills", then in the current era where Skills are gaining more and more popularity, you might have the following questions:
Shouldn't a Skill just be a single Markdown file? Why do I see others' Remotion Skills with a bunch of Rules and stuff?
Why does my SKILL.md feel dumber the longer I write it?
How can I create a really powerful Skill like others?
If you've ever had such thoughts, then today's article will completely resolve your doubts and concerns. We'll move beyond the single-file mindset of SKILL.md and enter the world of "document architecture."
This article will be quite long, but don't worry—it's still beginner-friendly, and with practical examples you can try right away, I believe you'll be able to create your own Skill masterpiece after reading it!
Today's topic: Skills Document Architecture.
Chapter 1: Why Isn't Your SKILL.md Enough? The Two "Dilemmas" of Single-File Thinking
When learning any new skill, we tend to prefer the simplest and most direct approach. For Claude Code Skills, this means stuffing everything into SKILL.md. This is perfectly fine at the beginner stage, but when you try to build a truly powerful, long-term Skill, the drawbacks of this single-file mindset become apparent.
Dilemma 1: The "Invisible Shackles" of Context
As everyone probably knows, when you pile all instructions, rules, example code, and reference documents into a single SKILL.md, every trigger of the Skill becomes a heavy "memory burden." Claude is like a scholar who must carry a thick encyclopedia at all times, even if just to look up a single sentence.
This leads to:
Dilemma 2: The "Nightmare Maze" of Maintenance
A SKILL.md exceeding 500 lines is a maintenance nightmare. Imagine you need to update the best practices for "database connection pooling." You have to carefully locate the relevant section in this huge text file using Ctrl+F, then modify it like a bomb disposal expert, hoping you don't affect other unrelated parts.
This highly coupled structure brings many problems:
Chapter 2: The Core of Skill 2.0 - Build Your "Skill" Like LEGO
Bidding farewell to the chaos of single files, we embrace the core idea of Skill 2.0: Modularity and Progressive Disclosure. This term might sound a bit "academic," but the principle is actually very simple, just like reading a book:
Claude Code uses Skills in exactly the same way. It doesn't swallow all information at once; instead, it first loads a lightweight "table of contents"—SKILL.md—and then, based on the task's needs, "flips through" more specific "chapters" via file links—those .md, .py, or .json files we've split out.
The essence of this architecture is to break down a large knowledge system into independent, cohesive, manageable "knowledge blocks." Then, through the "blueprint" of SKILL.md, these blocks are organically organized. This not only solves the "invisible shackles" of context but also makes maintenance, collaboration, and expansion unprecedentedly simple.
👹 The "rule weird tales" of document architecture are as follows:
markdown## 1.1 Only Mandatory Requirement: SKILL.md


my-skill/
└── SKILL.md    ← This is the only mandatory file

Without `SKILL.md`, Claude won't recognize this directory as a Skill.

## 1.2 Other Folders and Files: Completely Free

Except for `SKILL.md`, which must exist, **everything else is optional, and names are free**.


my-skill/
├── SKILL.md              # Mandatory
├── whatever-name/            # Free naming
│   └── any-file.md
├── abc.json              # Free
├── 中文文件夹/            # Chinese is allowed
│   └── 说明.txt
└── scripts/
    └── helper.py


**However, Claude will NOT automatically read these files!**

You need to explicitly tell Claude about these files and their purposes in `SKILL.md`.

---
Based on this core idea, two classic and practical document architecture patterns have emerged from community and official best practices: Knowledge Base and Workflow.
Pattern 1: Knowledge Base Architecture
Applicable scenarios: When your Skill is mainly to provide Claude with a set of static, structured knowledge, this pattern is your best choice. For example:
Core concept: "Atomize" knowledge. Each independent knowledge point should be a separate file, and SKILL.md acts as the "index" or "table of contents" for these knowledge points.
Directory structure:
plaintext📁 company-knowledge/
├── 📄 SKILL.md          ← Core entry: acts as knowledge index
└── 📁 knowledge/      # Rules directory (freely named, e.g., docs/, knowledge/)
    ├── 📄 术语表.md     # Knowledge point 1
    ├── 📄 产品FAQ.md
    ├── 📄 报销流程.md
    └── 📁  assets/                # (Optional) Store code examples or images
         └── xxx.tsx
How to write SKILL.md:
markdown---
name: company-knowledge
description: Company internal knowledge base. Use when needing to understand company terminology, product information, or internal processes.
---

# Company Knowledge Base

This is an internal knowledge base containing the following:

- **Glossary**: Explanations of common company terms → [knowledge/术语表.md](knowledge/术语表.md)
- **Product FAQ**: Answers to common product questions → [knowledge/产品FAQ.md](knowledge/产品FAQ.md)
- **Reimbursement Process**: Detailed steps for expense reimbursement → [knowledge/报销流程.md](knowledge/报销流程.md)

Please refer to the corresponding knowledge file based on the user's question.
How it works:
When a user asks "What does OKR mean in our company?", Claude will:
Claude Code won't open "Product FAQ" or "Reimbursement Process" because they're irrelevant to the current question. That's the power of "on-demand access."
⚠️ In other words, if SKILL.md doesn't mention that certain files need to be used, those files will never be used!
Pattern 2: Workflow Pattern - Build Your "Automated Pipeline"
Suitable scenarios: When your Skill is meant to complete a multi-step task.
Typical examples:
Core concept: "Processize" the task. Break down a complex task into a series of linear, independently executable and verifiable steps, each as a separate file.
Recommended directory structure:
plaintext📁 weekly-report/
├── 📄 SKILL.md              ← Commander-in-chief
├── 📁 workflow/
│   ├── 📄 step1-收集信息.md        # Step 1
│   ├── 📄 step2-整理内容.md       # Step 2
│   └── 📄 step3-生成周报.md       # Step 3
├── 📁 templates/
│   └── 📄 周报模板.md                     # Reference template
└── 📁 rules/
    └── 📄 写作规范.md                       # Guidelines
How to write SKILL.md:
markdown---
name: weekly-report
description: Automatically generate weekly reports. Triggered when the user says "write a weekly report" or "generate this week's summary".
---

# Weekly Report Generator

Please strictly follow the steps below:

## Execution Checklist

- [ ] **Step 1: Collect Information** → Follow [workflow/step1-收集信息.md](workflow/step1-收集信息.md)
- [ ] **Step 2: Organize Content** → Follow [workflow/step2-整理内容.md](workflow/step2-整理内容.md)
- [ ] **Step 3: Generate Report** → Follow [workflow/step3-生成周报.md](workflow/step3-生成周报.md)

## References

- Weekly Report Template: [templates/周报模板.md](templates/周报模板.md)
- Writing Guidelines: [rules/写作规范.md](rules/写作规范.md)
How it works:
When the user says "Help me write a weekly report", Claude will:
It's like an assembly line, where every step is clear and nothing is missed or out of order!
Knowledge Base vs. Workflow: How Should I Choose?
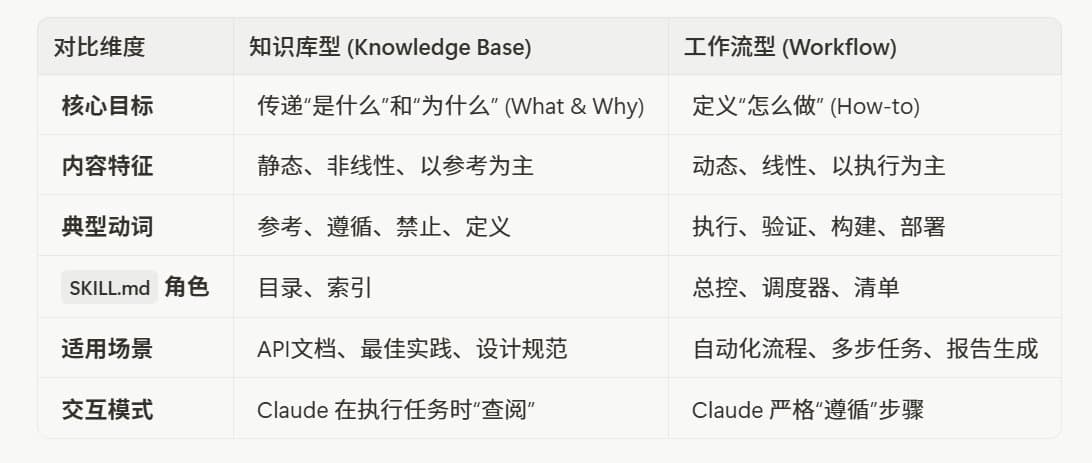
Of course, in real-world complex projects, these two modes are not mutually exclusive. You can absolutely introduce a reference/ directory within a workflow-type Skill to store knowledge-base-type reference documents.
Once you master these two core architectures, you have the foundation to build any complex Skill. Next, we'll move into the practical phase, guiding you step by step from scratch to build a Skill that is both practical and well-structured!
Chapter 3: Hands-On Practice! Build Your First "Architected" Skill in 10 Minutes
The theory is over; now let's get practical! I'll guide you from scratch to build a truly useful "AI Weekly Report Assistant" in 10 minutes.
I chose the weekly report for this example because:
💡 The following longer section consists of template files for you to Copy & Paste and experience! After you finish the practical steps, your structure should look like this:
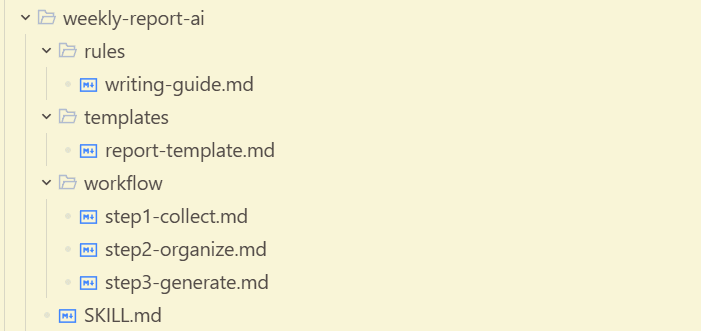
🔥 For the first few steps, just follow along with Copy & Paste. All insights will be unlocked in the "final step"!
Step 1: Create the Folder Structure
Open your terminal (or file manager) and create the following structure:
bashmkdir -p weekly-report-ai/workflow
mkdir -p weekly-report-ai/templates
mkdir -p weekly-report-ai/rules
After creation, you should have a directory like this:
plaintext📁 weekly-report-ai/
├── 📁 workflow/      (Stores execution steps)
├── 📁 templates/     (Stores output templates)
└── 📁 rules/         (Stores guidelines)
Step 2: Write the "Writing Guidelines" (Rules)
This is the "writing guide" for Claude, telling it how the weekly report should be written:
markdown# Weekly Report Writing Guidelines

## Language Style

- Use **concise, professional** language; avoid colloquial expressions
- Use **data and facts** as much as possible; avoid vague adjectives
- Keep each point to 1-2 sentences; don't write lengthy paragraphs

## Content Requirements

### ✅ Should Include

- Specific work completed this week (quantified results are better)
- Problems encountered and solutions
- Plans for next week

### ❌ Should NOT Include

- A running log of trivial daily tasks
- Problem descriptions without conclusions
- Content unrelated to work

## Format Requirements

- Use Markdown format
- Highlight key content with **bold**
- List items should not exceed 5; categorize if there are more
Step 3: Write the "Weekly Report Template" ( report-template.md )
This is the output format for the weekly report. Claude will strictly follow this template to generate content:
markdown# Weekly Report | {Name} | {Date Range}

## 📌 Weekly Summary

> Summarize the most important achievements of the week in 1-2 sentences

## ✅ Completed Items

### {Project/Module Name 1}
- Specific work completed
- Quantified results (if any)

### {Project/Module Name 2}
- Specific work completed

## 🚧 In Progress

- Work in progress but not yet completed
- Estimated completion time

## ❗ Issues and Risks

| Issue Description | Impact Scope | Solution/Support Needed |
| Issue 1 | Impact 1 | Solution 1 |

## 📅 Next Week's Plan

- [ ] Planned item 1
- [ ] Planned item 2
- [ ] Planned item 3
Step 4: Write the Workflow Steps
1️⃣ Workflow Step 1: Collect Information (step1-collect.md)
markdown# Step 1: Collect This Week's Work Information

## Your Task

Collect the following information from the user:

1. **What work was completed this week?**
   - Prompt the user to recall: What meetings were attended? What deliverables were submitted? What problems were solved?

2. **Were there any difficulties or obstacles?**

3. **What are the plans for next week?**

## Collection Tips

- If the user's answer is too brief, ask for details: "What was the specific outcome of this task?"
- If the user's answer is too verbose, help them distill the key points: "So the core achievement was XXX, correct?"

## Completion Marker

Once you have collected enough information, proceed to the next step.
2️⃣ Workflow Step 2: Organize Content (step2-organize.md)
markdown# Step 2: Organize and Categorize

## Your Task

Organize the collected information:

1. **Categorize**: Group work content by project or module
2. **Distill**: Condense verbose descriptions into 1-2 sentences
3. **Quantify**: Add data where possible (how much was completed, what percentage was improved)
4. **Prioritize**: Put important items first

## Reference Standards

When organizing, refer to the writing guidelines in [rules/writing-guide.md](../rules/writing-guide.md).

## Completion Marker

After organizing, you should have a clear and structured content outline.
3️⃣ Workflow Step 3: Generate the Report (step3-generate.md)
markdown# Step 3: Generate the Final Weekly Report

## Your Task

1. Open [templates/report-template.md](../templates/report-template.md)
2. Fill in the organized content into the template
3. Check that the format is correct
4. Output the final weekly report

## Output Requirements

- Output the weekly report directly in Markdown format
- Do not output any explanatory text
- Ensure all placeholders (e.g., {Name}) are replaced with actual content

## Complete!

After outputting the report, ask the user if they need any modifications.
Step 5: Write the Main Control File (SKILL.md)!
This is the "brain" of the entire Skill, tying everything together:
markdown---
name: weekly-report-ai
description: AI Weekly Report Assistant, helping users quickly generate professional work weekly reports. Triggered when the user says "write a weekly report" or "help me summarize this week's work".
---

# 🤖 AI Weekly Report Assistant

Hello! I am your weekly report assistant, and I will help you quickly generate a professional work weekly report.

---

## 📋 Workflow

Please execute the following steps in order:

| Step | Description | Detailed Guide |
| 1️⃣ | Collect this week's work information | [workflow/step1-collect.md](workflow/step1-collect.md) |
| 2️⃣ | Organize and categorize content | [workflow/step2-organize.md](workflow/step2-organize.md) |
| 3️⃣ | Generate the final weekly report | [workflow/step3-generate.md](workflow/step3-generate.md) |

---

## 📚 References

- **Writing Guidelines**: [rules/writing-guide.md](rules/writing-guide.md)
- **Weekly Report Template**: [templates/report-template.md](templates/report-template.md)

---

## ⚡ Quick Start

Just tell me what you did this week, and I'll help you organize it into a weekly report!
Step 6: Witness the Magic!
Now, after ensuring the Skills are stored in the ~/.claude/skills/ directory, try entering the following in Claude Code:
markdown## Text Version
> Help me write a weekly report, buddy

## Command Version
/weekly-report-ai
If you see the following screen in Claude Code, it means the Skill exists in your directory:
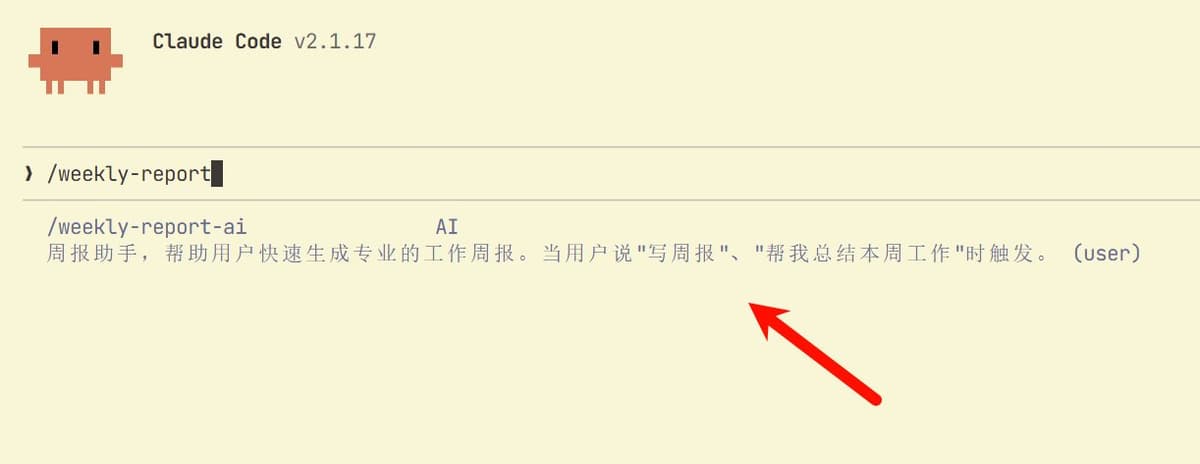
When you enter the command and tell Claude Code about your week's work, you'll be amazed to find that it actually follows your Workflow settings! Just like the image below:
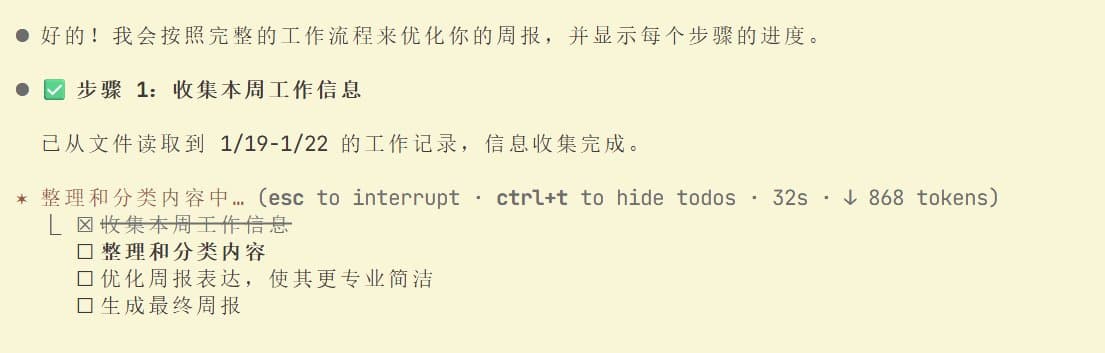
Claude Code will:
From now on, the Friday afternoon weekly report anxiety before leaving work is gone! 🎉
Chapter 4: Three Advanced Tips to Make Skills More Powerful
What Skills can do goes far beyond just a weekly report generator. They can even embed Programs to handle various needs, but due to space limitations, today we'll still use the weekly report generator as an example to help everyone understand!
Tip 1: Use Configuration Files for "One-Click Switching"
If you need to use the same Skill in different scenarios (e.g., writing weekly reports for different departments with different format requirements), you can use configuration files to achieve this.
plaintext📁 weekly-report-ai/
├── 📄 SKILL.md
├── 📁 config/
│   ├── 📄 tech-team.json      ← Tech team configuration
│   └── 📄 marketing-team.json ← Marketing team configuration
└── ...
The JSON format files inside can contain structured data, as shown below:
json{
  "team_name": "Tech Department",
  "focus_areas": ["Code Commits", "Bug Fixes", "Technical Proposals"],
  "report_style": "Data-driven, use metrics extensively"
}
Finally, you must reference the file in Skill.md, otherwise it won't take effect!
markdownPlease first read `config/tech-team.json` to understand the special requirements for this weekly report.
This way, switching departments only requires changing the configuration file reference, without modifying any instructions.
Tip 2: Use a "Prohibited List" to Prevent Claude Code from Making Mistakes
Sometimes, telling Claude "what not to do" is more effective than telling it "what to do"
We can create a dont-do.md in the Rule/ directory:
markdown# 🚫 Prohibited Items

The following behaviors are **absolutely prohibited**:

1. **No Fabrication**: Do not fabricate work content that the user hasn't mentioned
2. **No Emojis**: Weekly reports are formal documents; do not use emojis (except for this file)
3. **No Overly Long Paragraphs**: Single paragraphs should not exceed 3 sentences
4. **No Vague Expressions**: Do not use words like "some," "several," "approximately," etc.
Then, similarly, you must emphasize this in SKILL.md:
markdown⚠️ Before execution, please be sure to read the prohibited items in [rules/dont-do.md](rules/dont-do.md)!
Tip 3: Use a "Checklist" to Ensure Quality
Add a self-check step at the end, allowing Claude to review itself before output.
You can add an additional self-check step in the Workflow:
markdownworkflow/step4-review.md

# Step 4: Self-Check Before Output

Before outputting the final weekly report, check each item one by one:

- [ ] Does the format meet the template requirements?
- [ ] Are there any typos or grammatical errors?
- [ ] Are the data and facts accurate (no fabrication)?
- [ ] Does it violate any item in the prohibited list?
- [ ] Is the content concise (no fluff)?

**Only output the weekly report after all checks pass.**
This is like equipping Claude with a "quality inspector," greatly reducing low-level errors.
Conclusion: You're Not Writing a Skill, You're Building a "Digital Employee"
From that initial bloated, chaotic SKILL.md to the clear, structured, and well-defined "Enterprise-Grade Golden Architecture" before us now, we've come a long way — from "alchemy" to "modern chemistry." We are no longer satisfied with accidentally concocting effective "magic potions" (Prompts); instead, we have begun systematically building stable, predictable, and scalable "molecular structures" (Skill architectures).
This is the essence of Claude Code Skills 2.0.
When you start examining your Skill through the lens of "architecture," what you give Claude is no longer a collection of isolated instructions, but a complete, structured "digital brain."
Remember, what you are doing goes far beyond just improving AI work efficiency. You are defining a new future of deep collaboration with artificial intelligence. In this future, we are no longer "users" of AI, but its "designers" and "architects." Every well-structured Skill we build is a solid foundation stone for this intelligent era.